EarthRanger Setup Instructions
This guide walks you through connecting your EarthRanger instance to Safora. Once complete, Fence Shield observations and events will flow into your dashboard.
If you haven't already, read the Overview to see what data appears and how events behave.
Prerequisites
Before you begin, make sure you have:
| Requirement | Notes |
|---|---|
| An EarthRanger instance | Your organisation's live or sandbox environment |
| Admin access in EarthRanger | A user who can create DAS access tokens, source providers, event types and subject groups |
| A Gundi account | Gundi is EarthRanger's sensor integration platform |
If you're missing any of the above, check with your EarthRanger administrator or refer to EarthRanger's documentation.
Setup overview
There are five steps. Each builds on the previous one:
1. EarthRanger API token
Safora sends observations and events to your instance through Gundi, using the existing gundi_serviceaccount user. All you need to do is create an API token for that user.
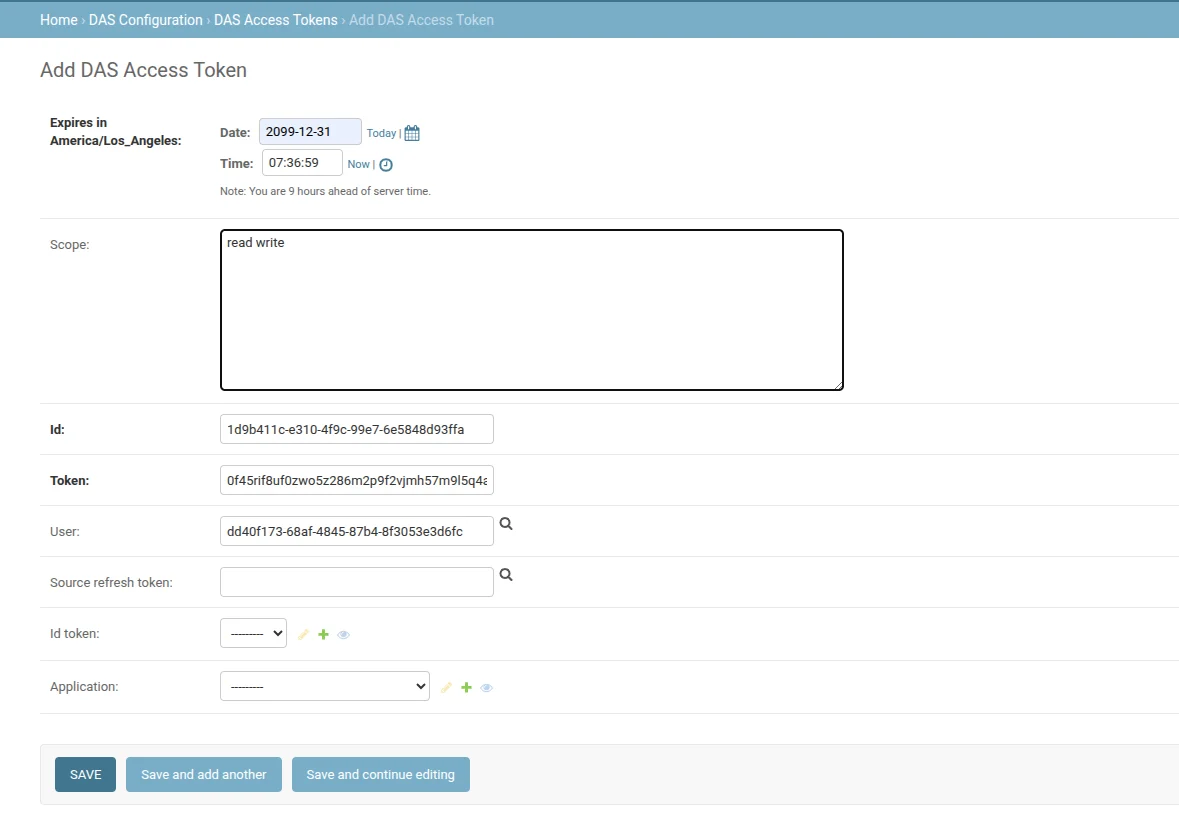
Create a DAS access token
-
Open your admin page at
your-domain.pamdas.org/admin. -
Go to Home > DAS Configuration > DAS Access Tokens > Add DAS Access Token.
-
Set Date to
2099-12-31and click Now for the time. -
Set Scope to exactly
read write. -
Generate a 40-character alphanumeric token. You can use a random alphanumeric generator (length 40, quantity 1).
-
Set User to
gundi_serviceaccount. Do this by pressing the magnifying glass and searching forgundi_serviceaccount.infoCan't find the
gundi_serviceaccountuser in your instance? Contact us at info@safora-tech.com and we'll help you with the setup. -
Copy the token and keep it somewhere safe. You will need it in the next step. Then click Save.
2. Gundi connection setup
Gundi receives data from Safora and formats it for EarthRanger.
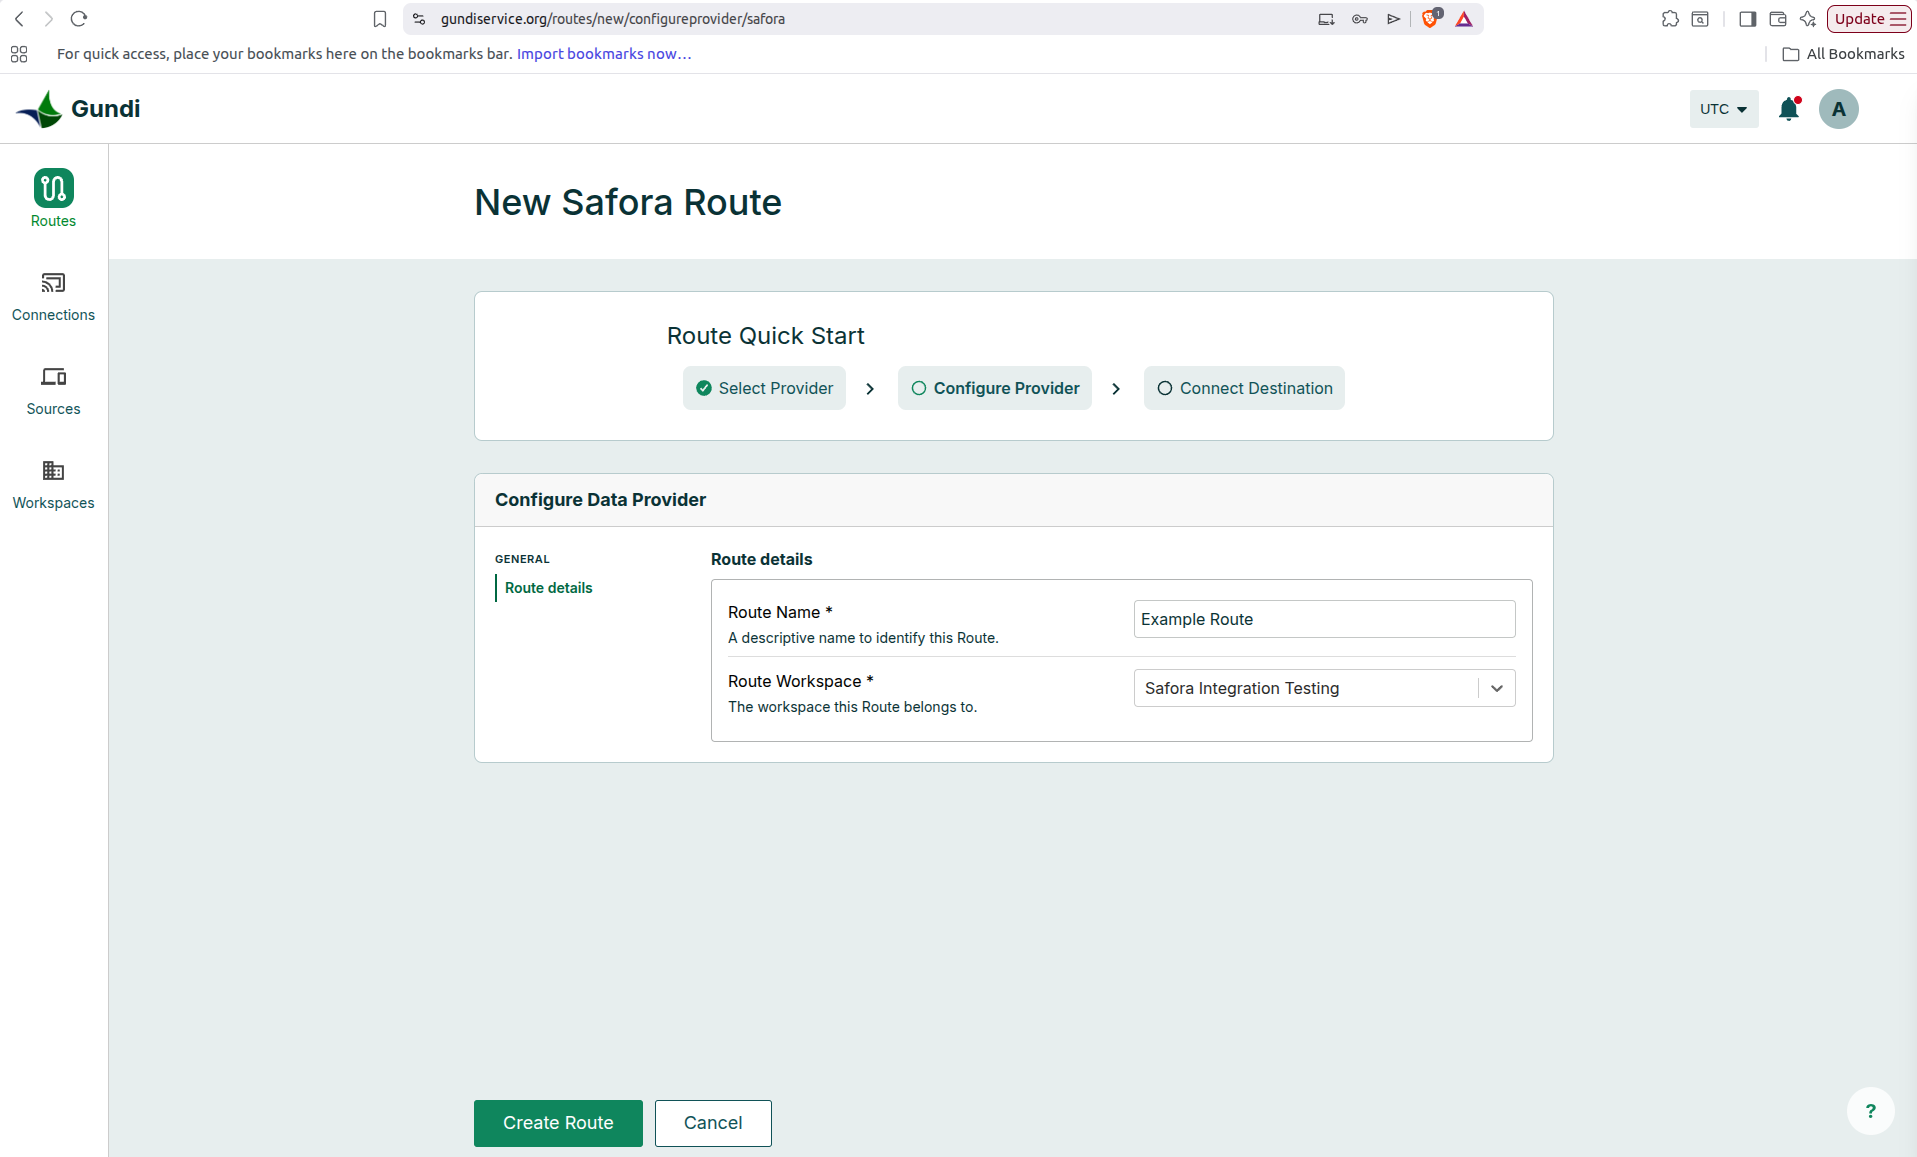
Create the route
- In Gundi, go to Routes > Create Route.
- Select Safora.
- Enter a Route Name (e.g.
Safora integration) and select your Workspace. - Click Create Route.
Add the EarthRanger destination
- On the next page, under Flow map, click Add destination.
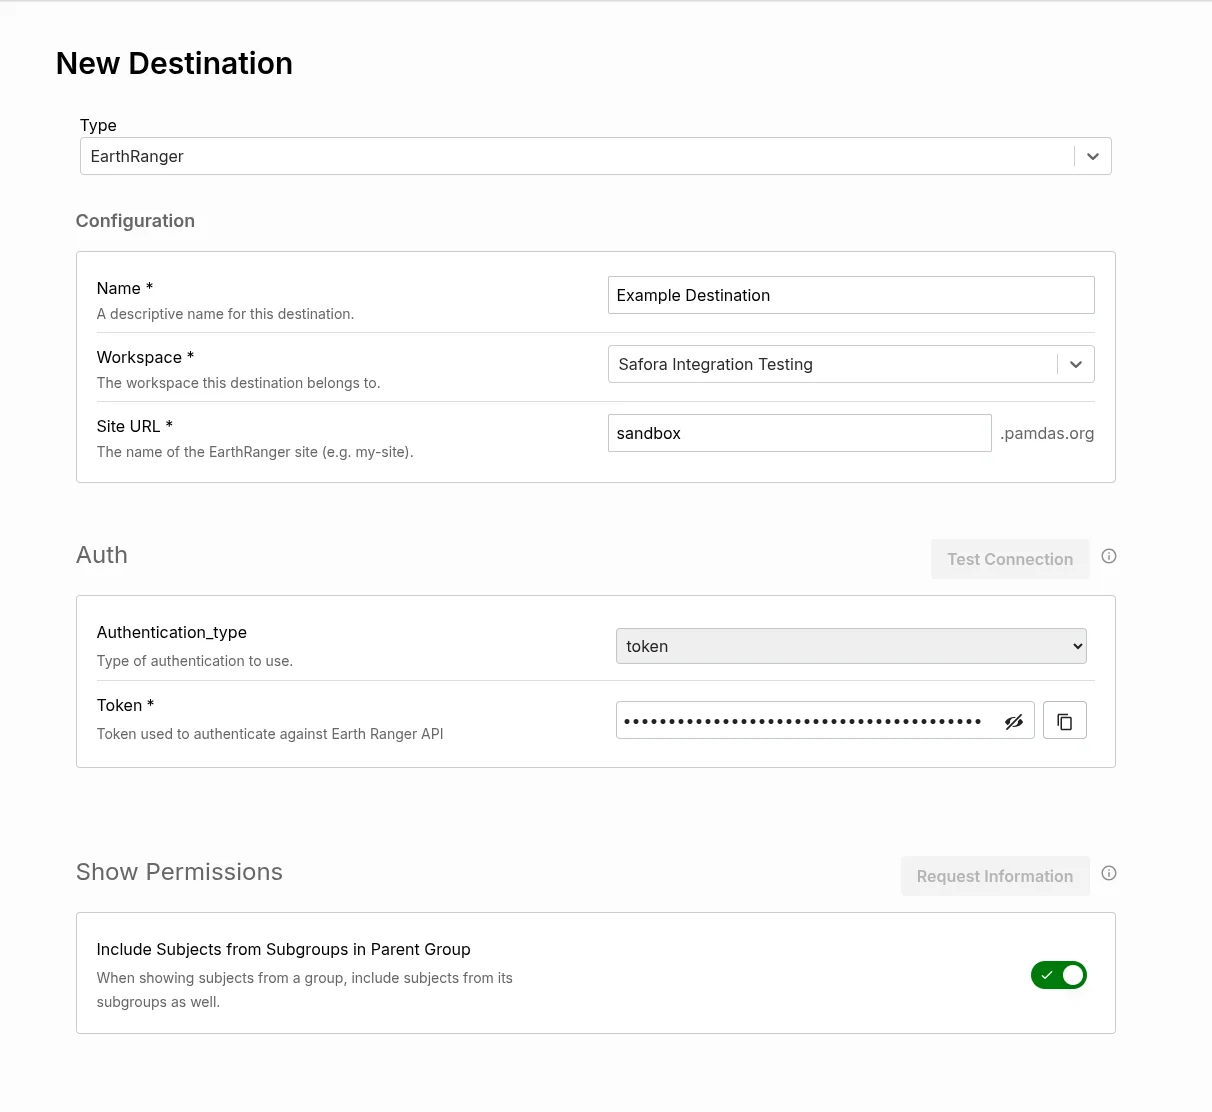
- Click Create new destination.
- Select EarthRanger.
- Fill in the following:
- Name: a label for your EarthRanger instance (e.g. your reserve name)
- Workspace: select your desired workspace
- Site URL: your official instance name, without
.pamdas.org - Token: paste the 40-character DAS access token from step 1
- Click Create Connection.
Share Gundi token with Safora
-
Go to Connections, open the connection by the name you picked, then open the Auth tab.
-
Copy the Token. This is the API key Safora needs.
-
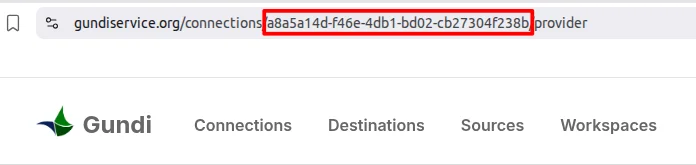
From the same page, copy the connection ID from the URL. It looks like this:
https://gundiservice.org/connections/9a6450ca-c695-4341-ab2e-4e122920697cHere the connection ID is
9a6450ca-c695-4341-ab2e-4e122920697c. Save it somewhere as you will need it for the next step.
Send the Token to the Safora team at info@safora-tech.com together with your EarthRanger instance name so we can complete the integration on our side. Treat the token like a password: do not share it publicly.
3. Source provider
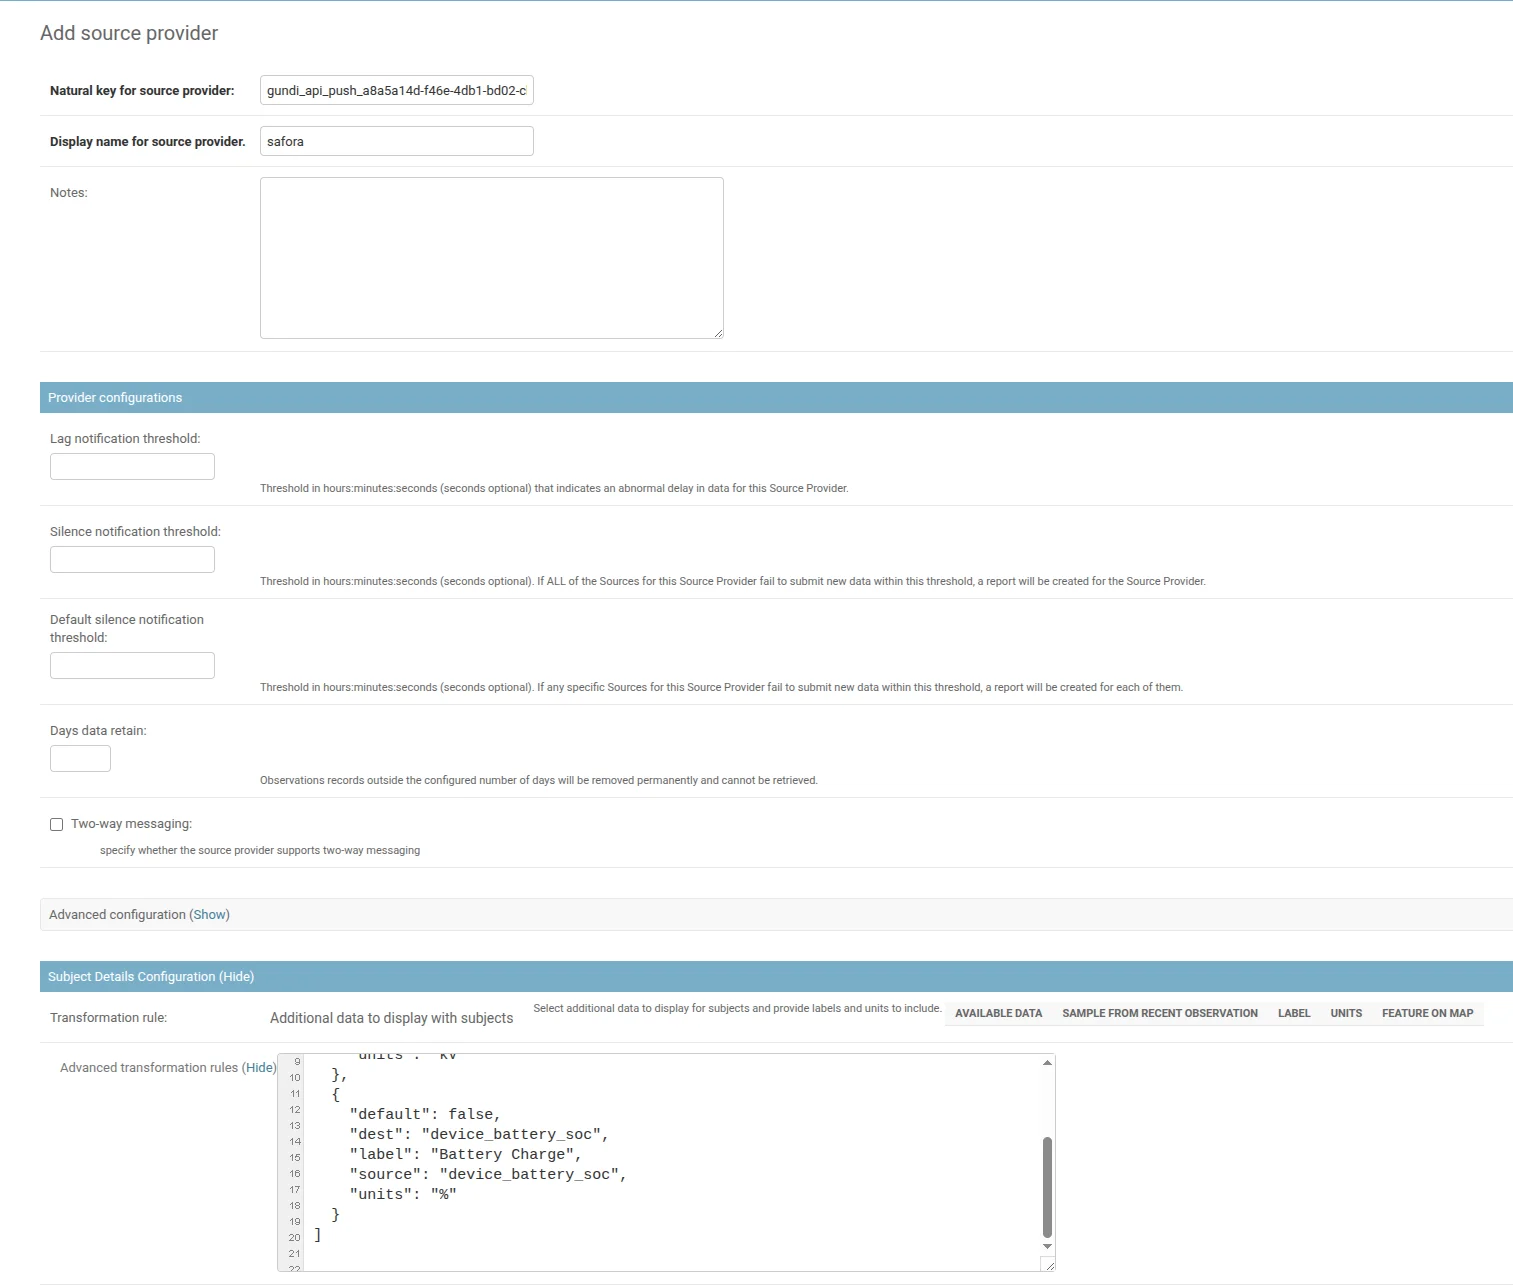
The source provider tells EarthRanger how to display Fence Shield measurement data, right from your dashboard.
-
Go to Home > Observations > Source providers > Add source provider.
-
Set Natural key to:
gundi_api_push_{connection-id}Replace
{connection-id}with your Gundi connection ID. For example:gundi_api_push_9a6450ca-c695-4341-ab2e-4e122920697c -
Set Display name to
Safora. -
Click Show under Subject Details Configuration.
-
Click Show under Advanced transformation rules and paste exactly:
[
  {
    "default": true,
    "dest": "fence_voltage",
    "label": "Fence Voltage",
    "source": "fence_voltage",
    "units": "kV"
  },
  {
    "default": false,
    "dest": "device_battery_soc",
    "label": "Battery Charge",
    "source": "device_battery_soc",
    "units": "%"
  }
]
- Click Save.
4. Event types
Create the three Safora event types with the EarthRanger command-line tool (er). It sets up the Safora Fence category and all three event types in one go. These steps follow EarthRanger's Safora Fence Event Types guide.
1. Install the command-line tool and sign in
You need a terminal with Python 3.11 or newer and pipx installed, plus an EarthRanger account on your site.
pipx install earthranger-cli                               # installs the 'er' command
er profile add sitename --server sitename --username you   # 'sitename' is your subdomain, e.g. 'borana' for borana.pamdas.org
export ER_PROFILE=sitename                                 # use that profile in this terminal
er auth login                                              # asks for your EarthRanger password
The account you log in with must have permissions on the event category that will hold these event types.
2. Save the spec as safora-fence.yaml
The spec below creates the Safora Fence category and the three event types. To put them in a category your site already uses instead, change the category block at the top.
category:
  value: safora_fence
  display: Safora Fence
event_types:
- value: safora_fence_tamper
  display: Tamper Detected
  icon_id: threats_rep
  default_priority: red
  auto_resolve: true
  resolve_time: 186
  ordernum: 3
  layout:
    label: ''
    columns: 1
  fields:
  - key: fence
    label: Fence
    type: string
  - key: note
    label: Note
    type: string
- value: safora_low_fence_voltage
  display: Low Fence Voltage
  icon_id: fence_voltage_rep
  default_priority: amber
  auto_resolve: true
  resolve_time: 168
  ordernum: 7
  layout:
    label: ''
    columns: 1
  fields:
  - key: fence
    label: Fence
    type: string
  - key: voltage
    label: Voltage
    type: string
  - key: note
    label: Note
    type: string
- value: safora_low_battery
  display: Low Battery
  icon_id: low_battery_rep
  default_priority: amber
  auto_resolve: true
  resolve_time: 186
  ordernum: 50
  layout:
    label: ''
    columns: 1
  fields:
  - key: fence
    label: Fence
    type: string
  - key: charge
    label: Charge (%)
    type: string
  - key: note
    label: Note
    type: string
resolve_time is in hours, and ordernum sets where each type appears in the reporting menu. Both can be changed to suit your site.
3. Preview, then apply
er events apply safora-fence.yaml --dry-run   # shows what will be created or changed
er events apply safora-fence.yaml             # actually does it
Applying is safe to repeat: it creates what is missing and only patches what differs. Nothing is ever deleted.
4. Verify
er events list event-types --category safora_fence
er events show event-type safora_low_battery
You should see all three event types listed under the Safora Fence category.
5. Subject group
Last step. The subject group lets you show or hide all Fence Shield sensors on the map from one place.
- Go to Home > Observations > Subject groups > Add subject group.
- Set Name to
Fence monitors. - Make sure Visible is checked.
- Click Save.
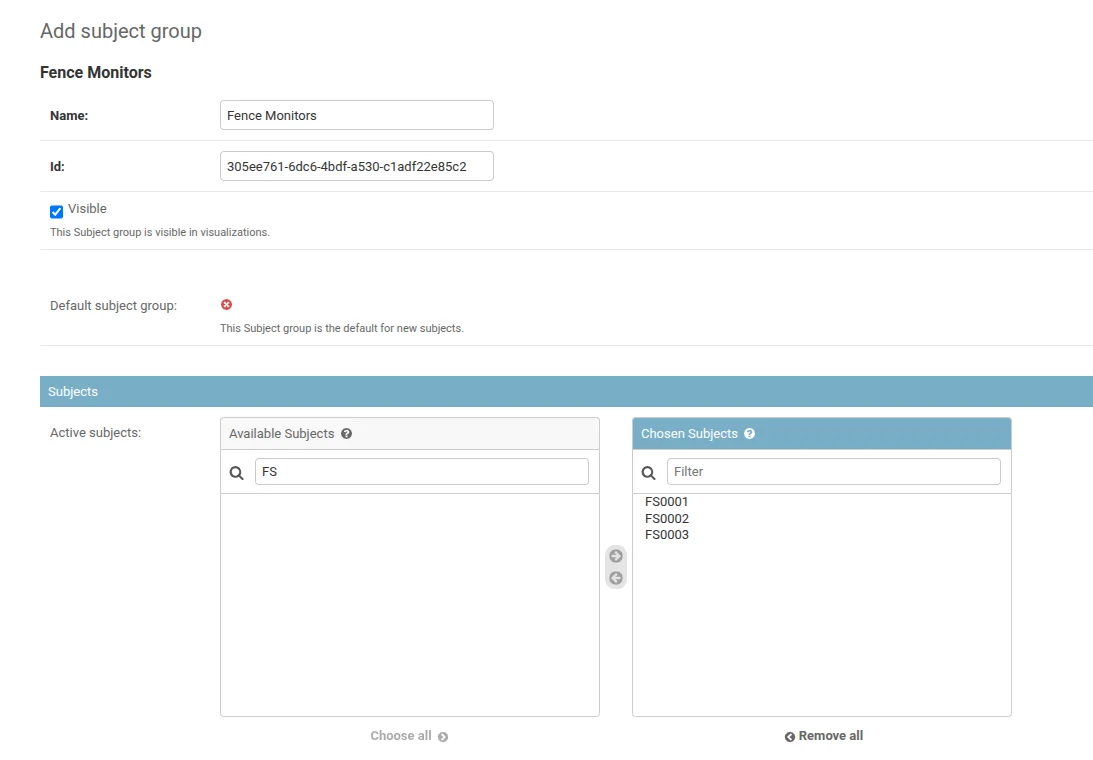
When you connect new devices, add them under Subjects. Note that they will only appear in EarthRanger after their first observation is sent.
To toggle visibility on the map, go to Map Layers > Subjects and check or uncheck Fence Monitors. See the Overview for details.
You're all set
Once Safora has your Gundi token and instance name, we will wire up the integration on our side. After the first devices send data, you should see observations and events appear in EarthRanger.
Questions along the way? Reach us at info@safora-tech.com.